How to create Blog on Blogger/Blogspot


Google owned the Blogger services online for providing single or multi user blogs for you. It is a secure platform for newbies who want to start their blog and want to get experience of blogging. Today's topic is fully devoted to newcomers who are seeking for the way to get started with blogger/ blogspot.

There are also many sites available where you can set out your blogging that too free. 11 Free Blog Sites

Blogspot is the sub-domain of Blogger.com so don't be confused, after creating your blog; you can use either Blogspot or Blogger; you will get access in the same page. So let's embark on your first bog with simple step.

1. Go to Blogger.com by putting it on the search bar of your browser or simply click here . Now decide you want to make a new account or want to get started with your existing Gmail account. Please to be noted you must have a gmail account for the Blogger's blog.

We will begin with our gmail account; as shown below step "Email>Password> Sign in

2.  Click on continue to blogger.


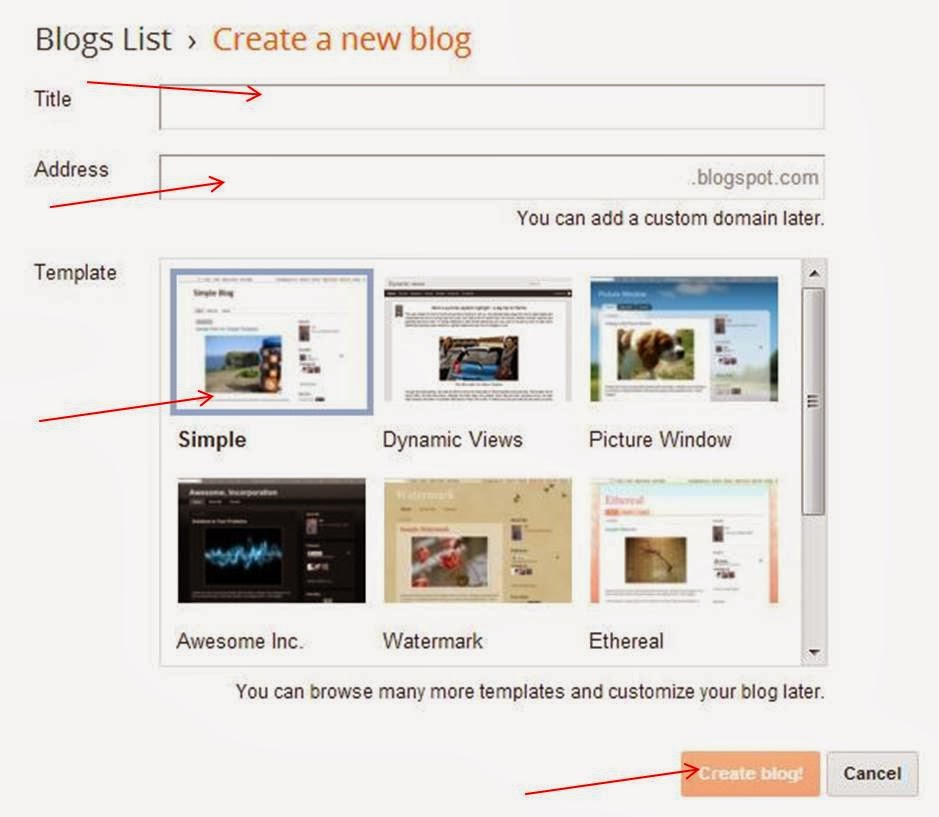
3.  Click on New Blog tab appears along the top left side of your blogger page.


4. Enter your blog name in "Title" and make url in "Address" for eg. I have created a blog

  • Title: Material Godown
  • Address: materialgodown (if your address will be available and nobody has taken the same name it will be allotted to you (You can see availability just below your address)
  • Click anyone of the templates (it can be changed later as per your choice)
To choose your template; you can see:

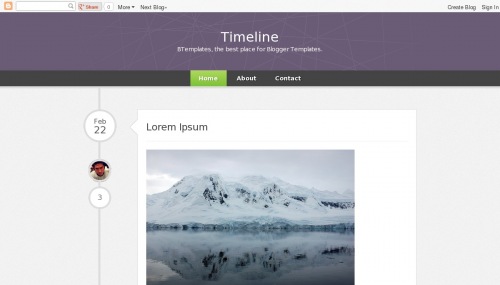
10 simple blogger template 

Gallery Template for Blogger

Magazine Template for Blogger


  • Click on "Create blog" button in bottom.


>


Done! If you want to see your blog just click on "view blog" appears on top.

Hope this simple tutorial will help you; tomorrow we will learn about creating pages on the web log.
Do not forget to give comments so that it can help me to improve my blog more.


Posted by
SMT

More

Verify your Blogger blog at Google Webmaster Tools


When I started blogging I faced a problem that my blogs are not appearing on web search, I am unable to see by search even. So I started studying about why I am not able to connect my blog to search engine. Finally I came to know that my blog need to get verified so that search engine can optimize it and people can find with links and keywords.

You ever wonder about Google search ranking on your blog? Well most of us know the answer what it would be! The major fight is with newbies who took up their blogging career recently and writing good content but unable to attract traffic on their blog.

I will showcase here most easy way to verify your Blogger's Blog with the help of Webmaster tool.

Do you wish to know some detailed information about your website's visibility to Google search Engine?
Do you want to see how Google's web crawlers visit your blog?
Do you want to know who links to your website?
Do you want to know what searches are used to find your website?
Do you want to control the appearance of your pages in Google web results?

If Yes! Then I recommend you to Webmaster Tools which is actually a Google service that provide help in the above questions.

As Google gives importance to Privacy, and before showing you stats and data it asks you to prove you own a website. Webmaster is SEO tool and verification does not affect the performance of your website in Google search results also it does not affect to Page Rank.

To verify your site is safe to invite visitors, it enables to make your blog or site in search on Google easily.

Well, today we will learn how to verify Blog on Webmaster Tools. Although there are many ways to verify but we will go with the easiest way to opt; that is "meta tag".

Now let me show you step by step tutorial; remember this process is for Blogger's Blog.
Google Webmaster Tools Verification Procedure
1. Go to Google Webmaster Tools

2. Sign in with the same Gmail account which you have been using for Blogger's blog.


3. Click on the red button "ADD A SITE" appears at the top right on the page.


4. Fill your Blog address "URL" on the place of "www.example.com" and click on continue.


5. Click on "Alternate Methods" and then HTML tag respectively.


6. Copy the highlighted link and go to your Blogger Dashboard. (Do not close this page, we will come again on it)

7. Go to template at Blogger Dashboard and then click on "Edit HTML"


8. Select CTRL+F and search , yellow highlighted area will show your search. Below paste your copied code (as per step 6) and save all changes by clicking on "Save Template" now view your blog. (Please do as mentioned in below picture) 

9. Go back to your Webmaster Tools page and click on verify. 
10. Done; you will be redirected to verified page.

Comments
Hope this tutorial will help you out in your verification process at Webmaster Tools. if still need any assistance please ask, I will definitely answer of your questions. Do not forget to comment, It will help me to improve my work.

Posted by
SMT

More

How to Fix Windows 7 Not Genuine Error quickly?


If you have been using windows 7 and right after you log on the pop up window occurs with;
This copy of Windows is not genuine 
Your computer might not be running a counterfeit copy of Windows. 
On the other hand if you see the accompanying symptoms;
You see the computer desktop background is black with the error like this;

Well, there are many reasons for confronting this problem; ultimately you will want to purchase the software and then install your windows will start working genuine. But most of us will not go for buy and search for free options :-)
Let me tell you, recently I also faced this problem and explored many options but it didn't work out. Finally I have used as an easy way to set it up and it worked for me. However I will share many of other option might be it could work for you.

As I am a professional and my all work depends upon my system working condition, so I could not wait for long. For fixing this problem you should have knowledge that about the days you have been confronting the problem. For this you will want to fix the system. Don’t worry, your files and data will not be harmed or lose, it will remain same, but the problem will be solved.

Steps to fix the windows 7 not genuine error;
Go step by step and fix it within 5 minutes,

1. Go to start and click on all programs

2. Now click on accessories folder

3.  Click on the System Tools.

4. System Restore will be clicking.

5. A window will open where you have to click on next button.

6. A system restore window will open, where you will be able to see some old dates. You can choose any of dates before the specific date on which your Windows not genuine problem was appeared first time. Let's say, I faced a problem on 16th September first time, and I picked 13th September to restore.
You can also scan first, by clicking on the second arrow as shown in the picture, and then click on next.

Your system will take just five minutes (also depends on the data you carry in your system) to restore and shutting down by itself. After complete the process, you can now start your system and log on to your desktop. You will be glad to ensure that your problem has been solved.
If you don't want to go for restart your system here is another procedure to get solution.

Windows 7 not genuine error fixing with Command Prompt

1. Go to start button and type cmd in search bar

2. Right click on cmd and run as administration

3. Type the command "SLMGR<SPACE>-REARM" as shown in image, and press enter.

4. A dialog box will be open like below.

5. Restart your system, and start working without any error.

Note: Most of people may find the problem while using second option, please make sure you followed each step correctly. If still having the problem and don't want to go for Command Prompt, you can download the "Remove WAT" and get free completely from the error.


Posted by
SMT

More

What is Android?


Android is one of the most famous technologies and we hear its name very often. Technically, Android is a computing platform which includes an operating system, software and applications for mobile devices and smart phones. Use this platform has expanded to other smart phones, tablet computers, E-readers, netbooks, and other devices. Basically Google inc. owned this technology maintained and developed by Android Open Source Project continuously.

In simple words Android is based on Linux operating system and Java Software applications where a large community of developers commonly writes applications (apps), including games, social networking, and business components, for Android smart phones. There are a wide range of free Android apps, including games and productivity titles, and paid apps are even more usually.

This rich basis of software gathering is used in Mobile Technology through its innovation module of The Software Development Kit (SDK).

One of the key components of Android technology is that it is open for modification. This gives marketers the opportunity to modify and enhance their products based on their own preferences.

Posted by
SMT

More

10 Simple Blogger Templates


Dear blogger users, this can be an ornament for your blog (blogger platform). Yes! You can give attire to your blog to look beautiful according to your wish. You may choose any from blogger wardrobe below showcasing first series with 10 templates. More to come with variety will suit your choice for blogger and WordPress platform.


 " Bloggerest: Demo & Download "


" Ajaxify: Demo & Download "


" Azsimple: Demo & Download "


Whitesmoke 1306: Demo & Download "


" The Tuts: Demo & Download "


" Timeline: Demo & Download "


" Covenant: Demo & Download "


" Rikka Takanashi: Demo & Download "


" Xmas Day: Demo & Download "


" Bj Blues: Demo & Download "


Posted by
SMT

More
Powered by Blogger.

Copyright © / Material Godown

Template by : Incredible-Divya / powered by :blogger